I’ve painted more blinds than I care to count, and I can tell you this: most people skip this step and wonder why their room never looks quite right.
You probably spent time picking the perfect paint color for your walls. Maybe you agonized over furniture. But your blinds? They’re still that builder-grade beige or white that came with the house.
Here’s the thing: paint on blinds ththomideas can completely change how a room feels. It’s the difference between blinds that stick out and blinds that belong.
I’m going to walk you through the exact process professionals use. Not the shortcuts you’ll find in most DIY posts. The real techniques that actually work.
This guide covers everything from prep work to finish selection. You’ll learn which paints hold up and which ones crack after a month. I’ll show you how to pick colors that make your blinds feel intentional instead of like an afterthought.
We’ve tested different methods and materials to figure out what delivers that high-end look without the custom price tag.
By the end, you’ll know how to turn standard blinds into something that looks like it was designed specifically for your space.
No guessing. Just a clear process that works.
Deconstructing the Aesthetic: Core Principles for an Elevated Look
When I first started experimenting with painted blinds back in 2018, I made every mistake you can imagine.
Bright white. High gloss. Zero thought about how it would actually feel in the room.
It looked terrible.
Here’s what I learned after spending the better part of a year fixing those early attempts. This isn’t about slapping some what paint on blinds Ththomideas and calling it done.
It’s about creating a mood.
The color is just the starting point. What really matters is how texture, finish, and tone work together. Think of it like cooking. You wouldn’t just throw salt in a pan and expect dinner.
Let me break down what actually works.
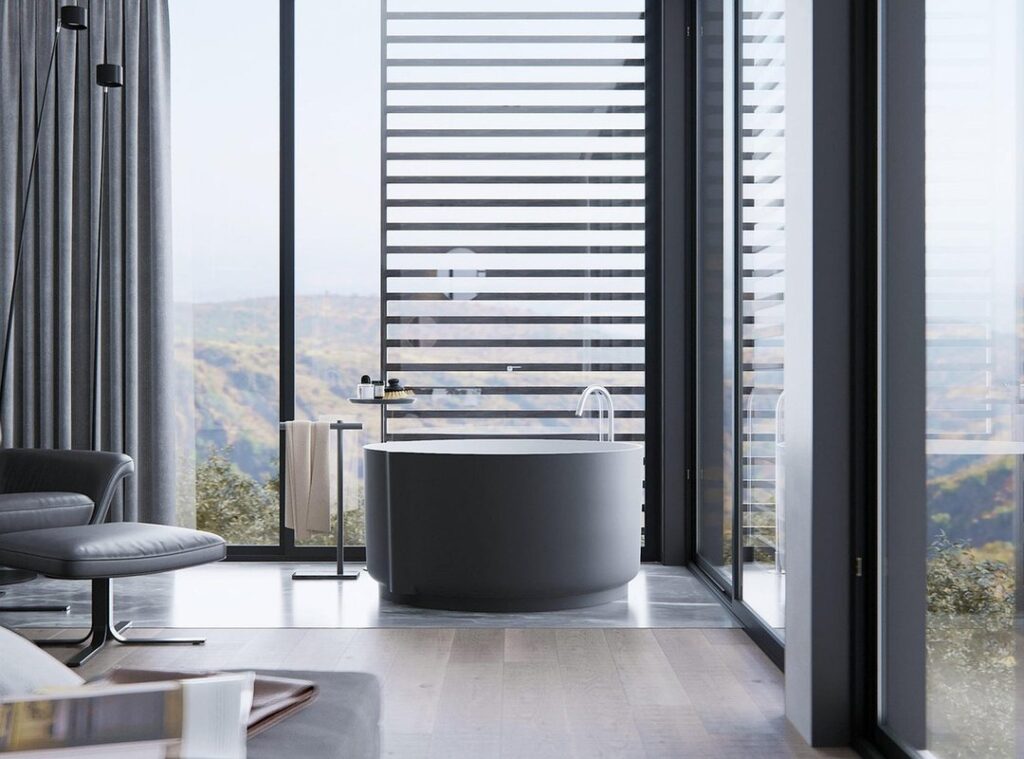
The colors that make a room feel expensive? They’re never loud. I’m talking earthy tones, deep charcoals, soft greys, warm off-whites. The kind of palette you see in those boutique hotels where everything just feels right.
Primary colors belong in playrooms (and even then, I’d think twice).
Now here’s where most people mess up. They pick the right color but go glossy. Don’t do that.
Matte or satin finishes absorb light instead of bouncing it around. After testing both in my own space for three months, the difference was obvious. The matte finish added depth. It made the blinds feel like part of the architecture instead of an afterthought.
Glossy just looked cheap and reflected every imperfection.
But the real secret? Nothing exists in isolation.
Your painted blinds need to talk to your walls, your textiles, your furniture. When I finally got this right, I matched my blinds to a shade that sat between my wall color and my sofa fabric. Not exact. Just in the same family.
That’s when the room started to feel cohesive instead of like I’d just bought random stuff and hoped for the best.
You can read more about setting up your space thoughtfully in what to consider before buying a home ththomideas.
The whole room should tell one story.
Phase 1: Preparation is Everything
I was talking to my neighbor last week about her blinds project.
“I just want to slap some paint on these and be done,” she said.
I had to stop her right there.
Because here’s what happens when you skip prep. The paint peels off in sheets within a month. I’ve seen it happen more times than I can count.
Preparation isn’t the fun part. But it’s the part that separates a project that lasts from one that becomes a weekend redo.
Picking Your Canvas
Not all blinds can handle paint.
Wood blinds? Perfect. They take paint beautifully. Aluminum works too, though you’ll need the right primer. PVC and vinyl blinds are doable if you follow the steps.
But fabric blinds? Don’t even try it. Same goes for bamboo. The paint won’t stick properly no matter what you do.
One of my readers emailed me last month: “I tried painting my fabric blinds and they’re a disaster. What did I do wrong?”
The answer was simple. Wrong material from the start.
The Deep Clean
You need to clean these things like your life depends on it.
Blinds collect dust and grease you can’t even see. That invisible film will wreck your paint job before you even start.
Here’s what works:
• Mix TSP substitute with warm water (regular TSP works but the substitute is safer)
• Wipe down each slat front and back
• Rinse with clean water
• Let them dry completely
I mean bone dry. Not mostly dry. If there’s any moisture left, you’re asking for trouble.
Why Sanding Matters
“Do I really need to sand?” people ask me all the time.
Yes. You really do.
Grab 220-grit sandpaper and give each slat a light scuff. You’re not trying to remove material. You’re just roughing up the surface so the primer has something to grab onto.
Skip this step and your paint will slide right off when you touch the blinds later. I’ve tested what paint on blinds ththomideas recommends and the sanding step shows up in every successful project.
Setting Up Your Workspace
Take the blinds apart if you can. Remove the slats from the headrail and lay them flat on a drop cloth.
This gives you access to every surface. No awkward angles or missed spots.
“Won’t that take forever to put back together?” someone asked me once.
Maybe. But it’s faster than repainting because you missed half the slat edges.
Work somewhere with good airflow. A garage with the door open works. So does a covered patio. Just don’t do this in your living room unless you want paint fumes for days.
Phase 2: Selecting the Perfect Materials and Tools
Most DIY guides will tell you that any primer works fine for blinds.
They’re wrong. For the full picture, I lay it all out in Home Tips and Tricks Ththomideas.
I’ve seen too many people waste time and money using standard primers on vinyl or metal blinds. The paint peels off within weeks because the primer couldn’t grip the slick surface.
Here’s what actually works.
You need a high-adhesion bonding primer made specifically for non-porous surfaces. Regular wall primer won’t cut it. The bonding kind creates a chemical grip that standard primers just can’t match.
Now let’s talk about what paint on blinds ththomideas actually delivers results.
Everyone says brush-on paint is fine if you’re careful. But I’m going to be straight with you. Spray paint wins every time. It gives you that smooth, factory finish without a single brush mark. No streaks. No texture issues.
I go with satin finish most of the time. Matte looks great but shows every fingerprint (and if you have kids, you know what I mean). Satin hides the everyday wear better.
Want custom colors? A paint sprayer with quality latex paint works. It takes more setup but gives you unlimited color options. Chalk paint is another route if you want that ultra-matte, textured look. Just know it feels different than the original blinds.
Here’s what you’ll need beyond paint:
Tack cloth for dust removal. Painter’s pyramids so your blinds don’t stick to anything while drying. Quality painter’s tape. Drop cloths. And don’t skip the mask and gloves.
Your lungs and skin will thank you later.
Phase 3: The Painting Process for a Flawless Finish
Alright, this is where things get real.
You’ve cleaned your slats. You’ve prepped your workspace. Now comes the part where you either end up with gorgeous custom blinds or what looks like a kindergarten art project gone wrong.
(No pressure.)
Let me walk you through this so you don’t end up with drips running down your slats like sad little paint tears.
Applying the Primer
Start with a thin coat of primer on all your slats. And I mean thin. You’re not frosting a cake here.
Coverage matters way more than thickness. You want every surface touched by primer, but you don’t need to drown it. Think of it like sunscreen. A good even layer beats globbing it on in spots.
Perfecting Your Spray Technique
Here’s where most people mess up.
Hold that spray can 10 to 12 inches from the slat. Not 6 inches. Not 18 inches. Right in that sweet spot.
Use sweeping motions. Start spraying before you reach the slat and keep going past the edge. This prevents those annoying heavy spots at the ends.
Overlap each pass by about 50%. It’s like mowing a lawn. You want a little bit of crossover to avoid stripes. For the full picture, I lay it all out in How to Make Bar Stool Ththomideas.
And for the love of all that is holy, keep moving. The second you pause in one spot, you’re getting a drip. I’ve learned this the hard way more times than I care to admit.
Building Up Thin Coats
Two or three thin coats will always beat one thick coat. Always.
I know it’s tempting to just blast everything and be done. But that’s how you get runs, sags, and a finish that looks lumpy.
Check your paint can for drying times between coats. Most say 15 to 30 minutes, but actually read it. Different paints have different rules.
When you’re working on what paint on blinds ththomideas, patience really does pay off.
Flipping and Finishing
Let one side dry completely before you flip those slats over. I usually give it at least an hour, sometimes two if I’m not in a rush.
When you flip them, be gentle. Even if they feel dry, they’re still vulnerable.
Paint the other side using the same technique. Same distance. Same sweeping motions. Same thin coats.
Curing Time and Reassembly
Here’s something that trips people up.
Dry to the touch doesn’t mean ready to go. Your blinds might feel fine after a few hours, but they’re not fully cured yet.
Wait at least 24 to 48 hours before you put everything back together. I know that feels like forever when you’re excited to see the finished product, but trust me on this.
If you rush it, you’ll end up with slats sticking together or paint chipping off when you try to hang them. And after all this work, that would just be heartbreaking.
Give it time. Go do something else. Binge a show. Set up that golf training room you’ve been thinking about.
Your blinds will be worth the wait.
Your Vision, Beautifully Realized
You now have the complete blueprint for turning generic window treatments into a custom feature that embodies a thoughtful and cohesive design philosophy.
Your blinds don’t have to be an afterthought anymore.
By following these steps, you’ve integrated them perfectly into your home’s aesthetic. They’re part of the design now, not just something that hangs in the window.
This method works because it prioritizes meticulous preparation and the right material choices. You get a durable, professional-grade result that lasts.
I’ve seen what happens when you paint on blinds ththomideas the right way. The transformation is real.
Take a look around your space. What other functional items could you transform into beautiful design elements using these same core principles?
The approach is the same: prepare well, choose quality materials, and treat every detail like it matters.
Your home deserves that level of care.
 Helen Rogersofers is a leading expert in functional home optimization and contemporary decor themes. She specializes in translating high-level design theory into practical, accessible setup strategies that maximize the potential of any floor plan. Through her insightful breakdowns and focus on material textures, Helen empowers individuals to refine their surroundings with confidence, making sophisticated design achievable for the everyday enthusiast.